Monday, October 29, 2012

Hi everyone, it's Babette here. And today I would like to share this card with you with the gorgeous Cowgirl Lili.
For this card I used papers from My Minds Eye. I have made the borders with my silhouette. Stars are from My Favorite Things. A sentiment from ??? , faux stitching and some Inky Pearls to finish it. 
 
I hope you like my card, have a wonderful Monday and until next time.

Babette

Friday, October 26, 2012

Medical Journal - Tonya

Good morning! Thank you for stopping by for another inspirationsl post from us. Today I am sharing a medical journal I put together for a friend of mine. Time has been really short for me lately, so I needed a really fast and easy gift. This is a great project for a beginning crafter. A child could easily make this for their teacher using Lili's First Day of School.

 
I bought the journal at Michael's for $1. I added a big red gem to the closure to give it some bling. I tied ribbon on to the spiral binding. I then made a bookmark using a giant paperclip and Nurse Lili. I attached the bookmark to the journal using temporary adhesive so it could be removed.


I hope you enjoyed today's project. Although, it is not fancy, it is a cute gift that is very simple to make and only takes a few mintues.

Have you seen all of the fabulous creations at the challenge blog? If not, head over and check them out. The Inkettes made some fabulous creations for our fall or Halloween challenge.

I hope you have a fabulous and creative day! Until next time.......

Tuesday, October 23, 2012

Angelica's Sled

Good morning crafters, Vicky here to inspire you today with a Christmas card.  I've just read that it's only 62 days until the big day!!  I think I need to make about 2 cards a day to have enough...oh boy, same every year, I wish I'd started earlier!!!

For this card I have used Angelica's Sled and the coordinating Angelica's Pretty Gifts.  I'll be the first to admit that I'm not very into masking, I like to stamp and go, but this one is so easy to use!  I stamped the gifts and masked in the usual way and then just guestimated where Angelica and her sled should go, no lining up gadgets needed.  And it was not just good luck, I have repeated it several times all with excellent results - this combination is a definite winner!!

I coloured this gorgeous image with promarkers and polychromos pencils, and used spellbinders nesties to cut it out.  The paper is My Minds Eye.


I hope you like this card and it has given you some ideas!!  

Remember to visit here again for more Inky Inspirations


Monday, October 22, 2012

A Christmas Wreath


Today I would like to share with you a special Christmas wreath. It was a lot of fun to create with non-Christmas images. I used Christmas items to transform these cute little images into a Christmas design.

To create my wreath I used the following stamps: Lili's Pumpkin, Nurse Lili, Lili's Cleaning Day. I used Copic markers Skin & Eyes E000, E00, B93, R20; Nurse R46, E31, YR20, YR21, C00; Hair on the other two E25, E31, E50; vacuum cleaner C0, C1, C3, Y13. For the earrings and buttons I used Liquid Pearls white, platinum and red. Lili's Pumpkin and Lil's cleaning day I did paper piercing with Graphic 45 Christmas Emporium and Authentique Peaceful. To create the flowers I used two different size Spellbinders circle die and red tulle. Lastly, to embellish the wreath I added flowers, two chipboard pieces from Graphic 45 Christmas Emporium with some green polka dot ribbon, misc. embellishments, and I used Cherry Lynne die small flourish. And a beautiful bow as the finishing touch.

A Picture of some of the supplies used to create the wreath.


A Close Up of "Lili's Cleaning Day"
What do you think of that Christmas vacuum cleaner? Don't you wish you had one?


A Close Up of "Lili's Pumpkin"


A Close Up of "Nurse Lili"


I am entering my project in the following challenges:
Pink Gem - Challenge #57 & DT Call - Flowers
Stamptacular Sunday -Challenge #186 No Rules

Crafty Sentiments - Bows or Ribbons

Sunday, October 21, 2012

SPLASH with Nicholas


Hi, Margreet here.
It's my turn to do the Inspirational Post at Inky Inspirations.
I decided to use a paperbag, which can be used to put a small present or money in. 
First I scored at 2,5 cm, then I stuck some patterned paper on the folded part. I made holes with the Crop-a-Dile and put eyelets in. I threaded beads with the letters SPLASH and knotted it through the holes. 
All papers are diecut and distressed with Tumbled Glass. The white papers are embossed with a bubble folder and also inked with Tumbled Glass.
The lovely stamp is Inky's Summer Splash Nicholas and is for sale here. He is coloured with copics. The stamped ticket, which says 'Always Explore' is stuck in an open spot under the stamp. The ribbon is stapled. The pearl adhesive stones are also for sale at Inky Impressions.


Here you can see Summer Splash Nicholas in a close-up.


Another close-up of the paperbag when it is opened. 


I hope I have inspired you with my little project!
Wishing you a wonderful Sunday!


Tuesday, October 16, 2012

First aid box with Nurse LiLi

Hello, crafty friends.

Hope you have a lovely Tuesday :-)

It's Dilyana here and it's my turn to inspire you with some creative project this month. Ever since I saw this cute Nurse LiLi stamp, I thought I'd make a first aid box for all of our pills and medicine at home. The box is a standart square one measured approximately 6x6 inches. I coloured LiLi with my Spectrum noir markers and I only put some flowers and this cute Inky sentiment which you can find here.


So tell me, how do you store your pills? :-)


I hope you like my project and I wish you a lovely day :-)

Dilyana

Monday, October 15, 2012

Monthly Blog Hop


We are so excited that you are joining us for the Inky Impressions Monthly Blog Hop! You are not going to want to miss any of the fabulous creations from the Inkettes or your chance at an Inky prize.
Be sure to leave a comment at every stop along the way for your chance to win. In honor of Breast Cancer Awareness Month we are giving away Awareness Ribbon Lili (shown below) and a sampling of Inky embellishments. Whoop whoop!


You have until 5 pm (est) on October 23 to leave your comments. The winner will be announced Octoner  24 on the Inky Impressions Challenge blog so be sure to stop by to see if you are an Inky winner! Good luck!
Your next stop is the fabulous Audrey.

Just in case you get off track, here is the complete list of blogs in the blog hop.

You're here>Inky Impressions Inspirational Blog<You're here

Thanks so much for joining us. Have a super week! :o)

Friday, October 12, 2012

Deputy Christopher


Hello, I have made a card using Deputy Christopher from Inky Impressions.


I have used a embossing folder for the clock then cut it out. I then inked & spray it with some glimmermist to give it a aged look. I have placed a piece of plastic on the clock face (not that you can see it in the photo), to hold the plastic on I have used a pearl brad in the centre of the clock.
I have also used a die to cut the stars.


I have used stickles on the clocks number for a bit of sparkle. I coloured Christopher using copic's.


I used a digi sentiment from Inky Impressions. I have also added some charms to the card, the cowboy boot is from Inky Impressions.
I hope you like my card & that I have inspired you to made your own Inky card.
To check out this stamp & more visit the Inky Store HERE


All the best
Kerry

Thursday, October 11, 2012

Treat Box

Hello dear friends! Fabiola here sharing a tutorial for my inspirational post. For today I decided to make a milk carton treat box, for a little girl who is going as super girl for Halloween, so I thought this was just perfect for her. So without further ado here is my tutorial....

Cut a piece of cardstock measuring 8''x12''


On the 12'' side score @ 2 1/2'', 5'', 7 1/2'', 10''


On the 8'' side score @ 1 1/2'', 5 1/2'', 7 1/2''


Fold and crease your score lines like so 


Cut the left small bottom piece and split to the score line the other 3 like so. Discard the little piece or keep it to make a small tag with it for your treat box. 


On the outside part of the flap where you cut the small rectangle, add some glue like this, covering the whole area, especially the edges.


Fold it over and glue the opposite side. You should have something like this


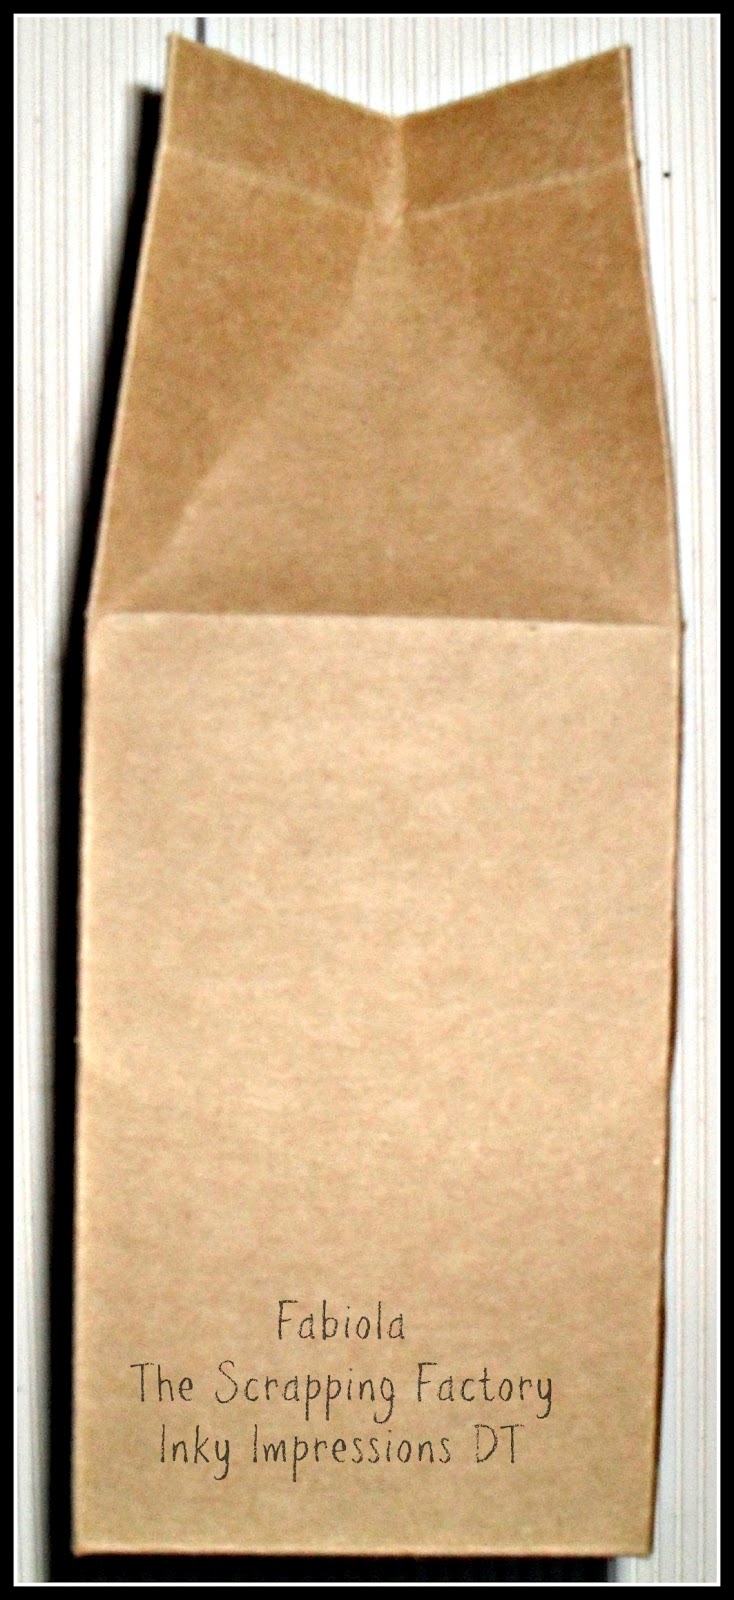
Fold and glue the bottom flaps like so 


On the other ends push the sides in like so


You are now ready to decorate your treat box. I have used Halloween papers, and the wonderful image is Super Girl Lili, I have colored her with Copic markers, if you don't have her, you have to get her, she is so easy to color, and the image can be used in so many different projects (Halloween, stay strong, etc) 

Here is my completed treat box


and a side view


and a close up of the fantastic, gorgeous inky image.


Happy Scrapping friends!!!!! 

Tuesday, October 9, 2012

A cute decorated gift box for Christmas

Hi all

Its Judith here - my turn for the inspirational post today and I've decided to show you a cute little gift box.  I've made this as a Christmas gift box using the lovely little stamp Marleigha and Pebbles Ice skating from Inky Impressions available here


I made my box using  the Crafters Companion Ultimate Pro.   I always use this  to make boxes - it takes literally minutes, all of the instructions come with the ultimate pro and all you need is some card, glue and a pair of scissors.


This is how I made and decorated this gift box

  • I constructed the box using white pearl card for the base and a snowflake patterned card from DCWV for the lid.
  • I then stamped and coloured the image using copics and prismacolour pencils and added silver glitter
  • Next I made a tag for the box using a sizzix label die and stamped the sentiment from inky impressions - it says - "Just for you .... so you don't have to share"  - really cute sentiment!
  • I decorated the tag with ribbon and a cute little winter penguin charm also from Inky Impressions

Hope you like it!

Hugs Judith x


Monday, October 8, 2012

A NEW USE FOR TISSUE PAPER:)

Hello everyone!  How are you today?  Inkette Audrey here with you.  It's Columbus Day here in the US and the kids are home from school and I am much later posting than I wanted to be, but what are you going to do?!?  My husband decided we needed to replace our driveway, so that also began this morning and there is a rather lovely story associated with that as well, but I will spare you those details here - you can head over to my blog to catch up on those.:)

I have a little tutorial to share with you today using tissue paper to make your own designer paper.  I'm using the Mod Podge again - I guess I like to get messy!  You will also need a piece of cardstock cut to the size of your 2nd or 3rd layer (wherever you want to use designer paper), so me it's my third layer.

You also need some sort of water color paints, preferably metallic in nature so they show up well.  I like Twinkling H2Os.  You also need water and a paint brush.  You could probably also use mists and get the same result.


 Measure/rip off a piece of tissue paper that is larger than your cardstock piece.

Crumple up the tissue - can do it a lot or a little depending on your desired result.


Place Mod Podge liberally all over your cardstock.


Then uncrumple tissue and lay it over cardstock piece.  It may rip, just add extra Mod Podge if this happens, it dries clear.


Paint little swipes all over the surface while still wet.  I usually use the lighter color first and then add it the darker color for accents.


Now let it dry and go work on the rest of your card.

Once it has dried, cut to size and you have your very own, homemade designer paper!!


For my card, I have used "Maddie the Elf" from INKY IMPRESSIONS SHOP.   I hope you like her.  I have added a sentiment from Memory Box, cut with Memory Box die, image cut with Nestie, ribbon from Offray and Prima bling and pearls.